Table of Contents
- how to add bank account to E*TRADE: The Full Walkthrough
- Step 1: Log Into Your E*TRADE Dashboard
- Step 2: Access the “Transfers” Section
- Step 3: Choose “Add a New Bank”
- Step 4: Verify Your Account
- Step 5: Set Up Transfer Preferences
- Common Issues When Learning How to Add Bank Account to E*TRADE
- Incorrect Routing or Account Numbers
- Bank Not Supported for Instant Verification
- Two‑Factor Authentication Conflicts
- Transfer Limits and Holds
- Tips to Streamline Future Bank Account Additions
- Security Considerations When Linking Bank Accounts
- What to Do If Verification Fails
- Using Linked Bank Accounts for Advanced Features
- Wrapping Up Your Bank‑Linking Journey
Getting your money moving in and out of a brokerage platform should feel as smooth as a well‑kept hardwood floor—no splinters, no surprises. For many investors, the first hurdle is simply learning how to add bank account to E*TRADE. Whether you’re funding a fresh account, pulling out dividends, or setting up automatic transfers, the process is pretty straightforward once you know where to click.
In this guide we’ll walk through every click, every field, and every verification step you’ll encounter. We’ll also sprinkle in a few handy tips for avoiding common pitfalls, plus a quick look at what to do if the system throws an error. By the end, you’ll be able to link your checking or savings account with confidence, and you’ll have a clear roadmap for managing those funds in the future.
how to add bank account to E*TRADE: The Full Walkthrough

Before you dive in, make sure you have a few things on hand: your bank’s routing number, your account number, and any online banking login credentials you might need for verification. If you use a bank that offers two‑factor authentication, have that device ready as well.
Step 1: Log Into Your E*TRADE Dashboard
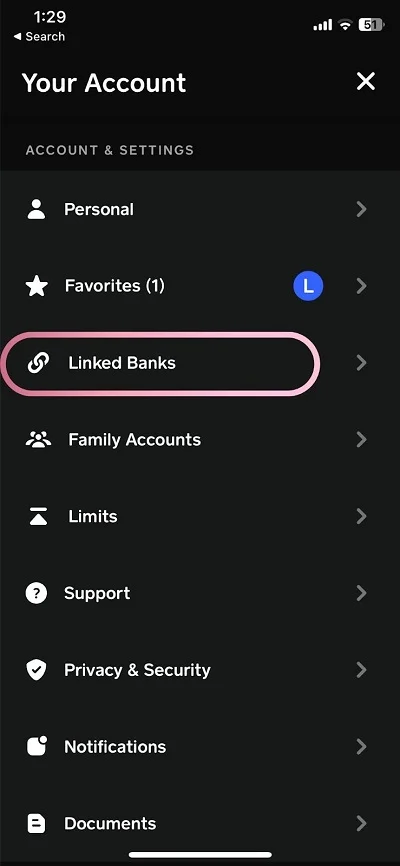
Start by navigating to the E*TRADE website and signing in with your username and password. If you’ve enabled multi‑factor authentication, you’ll be prompted for the additional code. Once you’re inside the dashboard, look for the “Accounts” tab located at the top navigation bar.
Step 2: Access the “Transfers” Section
Hover over “Accounts” and click on “Transfers.” This is the hub where you can move money between your linked bank accounts and your E*TRADE brokerage accounts. If you’re a first‑time user, you might see a welcome banner prompting you to “Add a Bank Account.” Click that button to get started.
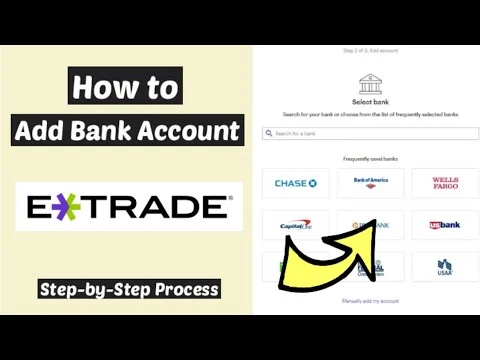
Step 3: Choose “Add a New Bank”
Inside the Transfers page, you’ll see a button labeled “Add a New Bank.” Clicking it opens a form where you’ll input the required banking details. This is the core of learning how to add bank account to E*TRADE. The form asks for:
- Bank name (or you can search from a dropdown list of popular banks)
- Routing number (9‑digit code for U.S. banks)
- Account number (your checking or savings account)
- Account type (checking or savings)
Step 4: Verify Your Account
E*TRADE uses two common verification methods:
- Instant verification: If your bank participates in the Plaid network, you can log in to your online banking directly from the E*TRADE portal. This method instantly confirms the account.
- Micro‑deposit verification: For banks that don’t support instant verification, E*TRADE will deposit two small amounts (usually less than $1) into your account. You’ll need to check your bank statement, note the exact amounts, and return to the E*TRADE site to confirm.
Once the verification is complete, the bank account will appear in your “Linked Accounts” list, and you can start transferring funds.
Step 5: Set Up Transfer Preferences
Now that the account is linked, decide how you want to move money:
- One‑time transfers: Perfect for occasional deposits or withdrawals.
- Recurring transfers: Set a schedule (daily, weekly, monthly) to automate contributions to your investment portfolio.
Make sure to double‑check the transfer limits—E*TRADE caps daily and monthly amounts to protect against fraud.
Common Issues When Learning How to Add Bank Account to E*TRADE
Even with a step‑by‑step guide, you might run into hiccups. Below are the most frequent problems and how to troubleshoot them.
Incorrect Routing or Account Numbers
A simple typo can cause the verification to fail. If you receive an “Invalid account information” error, double‑check the numbers against your bank statement or online banking portal. Remember that leading zeros are important; don’t drop them.
Bank Not Supported for Instant Verification
If your bank isn’t in the instant verification list, you’ll fall back to micro‑deposits. This process can take 1–3 business days. While you wait, you can still explore the platform’s research tools, but you won’t be able to trade with new funds until verification is complete.
Two‑Factor Authentication Conflicts
Some banks require a one‑time passcode sent to your phone or email. If you’re stuck on the verification screen, make sure your device is within reach and that you’ve entered the code correctly. If you’ve lost access to your authentication device, contact your bank’s support line for a temporary bypass.
Transfer Limits and Holds
E*TRADE may place a temporary hold on large deposits for security reasons. If you’re moving a substantial amount (e.g., over $10,000), expect a brief review period. You can contact E*TRADE’s customer service to expedite the process if needed.
Tips to Streamline Future Bank Account Additions

Now that you’ve mastered how to add bank account to E*TRADE, consider these best practices to keep the experience smooth for any future accounts you might link.
- Keep a digital copy of your bank details: A secure, encrypted note in a password manager makes copy‑and‑paste easy and reduces errors.
- Use a dedicated email for brokerage communications: This keeps trade confirmations separate from personal or work emails, reducing clutter.
- Enable alerts for deposits and withdrawals: Both your bank and E*TRADE can send SMS or email notifications, giving you instant visibility on fund movements.
- Regularly review linked accounts: Every few months, log in to the “Linked Accounts” section and verify that all information is up‑to‑date.
- Consider a secondary bank account for trading: Using a separate checking account solely for brokerage activity can simplify bookkeeping and tax reporting.
And if you’re looking for a break from finance talk, you might enjoy reading about the latest home‑care gadgets. For instance, the Shark Portable Carpet and Upholstery Cleaner for Deep Stain Removal offers a quick clean‑up after a snack spill—just as easy as a fund transfer.
Security Considerations When Linking Bank Accounts
Security is the backbone of any online financial activity. When you learn how to add bank account to E*TRADE, keep these safeguards in mind:
- Use a strong, unique password: Combine uppercase, lowercase, numbers, and symbols. Avoid reusing passwords from other sites.
- Enable E*TRADE’s two‑factor authentication: Even if your bank already uses it, an extra layer on the brokerage side adds protection.
- Keep your browser and operating system up to date: Security patches close known vulnerabilities that could be exploited during the linking process.
- Beware of phishing emails: E*TRADE will never ask for your password or routing number via email. If you receive a suspicious message, forward it to
phish@etrade.com. - Monitor account activity regularly: Spotting an unauthorized transfer early can save you from larger losses.
What to Do If Verification Fails

Even with perfect information, verification can sometimes fail due to bank‑side technical issues. Here’s a quick rescue plan:
- Refresh the page and retry: Occasionally, a session timeout causes a false error.
- Contact your bank’s support: Ask if they have any temporary restrictions on third‑party connections.
- Reach out to E*TRADE’s Help Center: Use the live chat or call the 24/7 support line. Have your account number and the error code handy.
- Consider an alternative verification method: If instant verification fails, opt for micro‑deposits, and vice versa.
Patience pays off—most verification failures are resolved within a day or two.
Using Linked Bank Accounts for Advanced Features
Once you’ve successfully added a bank account, you unlock a suite of advanced E*TRADE functionalities:
- Automatic investment plans (AIPs): Schedule recurring contributions to mutual funds, ETFs, or individual stocks.
- Cash sweep options: Uninvested cash can be swept into a high‑yield FDIC‑insured account, earning interest while you wait for the next trade.
- Margin loan repayments: Directly pull funds from your bank to pay down margin balances, avoiding overnight interest.
These features can help you automate your investment strategy, turning your brokerage account into a low‑maintenance wealth‑building engine.
Wrapping Up Your Bank‑Linking Journey
Learning how to add bank account to E*TRADE is more than a one‑time task; it’s the foundation for a seamless investing experience. By following the steps outlined above—logging in, navigating to Transfers, entering accurate banking details, and completing verification—you’ll have a reliable conduit for funding your trades and withdrawing earnings.
Remember to stay vigilant about security, keep your records organized, and take advantage of E*TRADE’s automation tools once your account is linked. With the right setup, moving money becomes as effortless as pressing “Buy” on a stock you’ve researched and love.
If you’re also interested in keeping your living space spotless while you watch your portfolio grow, you might check out the ROPVACNIC Robot Vacuum Cleaner and Mop Combo with 4000Pa Suction. A clean home can boost productivity, and a well‑funded account can boost your financial peace of mind.
Happy investing, and enjoy the smooth flow of funds between your bank and E*TRADE!