First day cover ·
Repairing a Chrome Sphere in Photoshop: Mirrored Halves and Clipping Masks for Metal Surfaces
Use a mirrored half to fix a flawed chrome sphere, then clip it into place with a mask. A practical symmetry technique for metal surfaces.
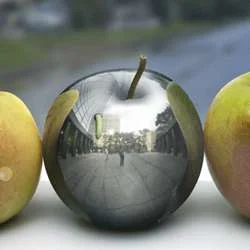
Metal is unforgiving. A polished chrome surface reflects everything around it, so a single blemish stands out far more than it would on a matte subject. That's why this workflow starts with a flaw rather than a perfect image: the reference sphere has a distracting opening on one side, and the job is to make it look like a clean, round object again.

Starting with a Usable Reference
The base image is a photograph of a chrome ball shot on a city street, sourced from Wikimedia Commons. Reference spheres like this are hard to find in good condition, which is part of the reason the tutorial leans on repair rather than hoping for a flawless shot. Here's the thing: once you accept that the source will be imperfect, you start looking for what's usable in it, and a symmetrical object gives you a lot to work with.
Begin by isolating the sphere. Select the Elliptical Marquee Tool and drag the selection with Shift held down, which keeps it a true circle. A slightly off-round selection will show up as a wobbly edge once you start transforming pixels, so take a moment to get this right. Press Ctrl + C to copy, then Ctrl + N to create a new document. Photoshop reads the dimensions of the copied selection and fills them into the New Document dialog, so you can confirm with OK and paste with Ctrl + V. Working in a document sized exactly to the sphere keeps the canvas clean and makes the later transforms easier to judge.

Using the Good Half to Correct the Bad One
This is the part I'd keep in your back pocket for other jobs. The flaw sits mostly in the right half of the sphere, while the left half reads as clean. Rather than painting over the damage, the tutorial duplicates the healthy side and mirrors it. The logic is simple: if the object is roughly symmetrical, the good half already contains the information you need to rebuild the bad half.
Select the left half with the Rectangular Marquee Tool, making the edge fall along the sphere's vertical centerline. Precision matters here. A centerline that's a few pixels off will show up as a seam, and reflective surfaces make seams obvious because the highlights and edges run continuously across the form.

Click the sphere layer to make it active, then press Ctrl + J. That copies the selected half onto its own layer. Hiding the original sphere layer while you work makes it easy to confirm that you're looking at the half alone, which is worth doing before you move anything.

Flipping and Positioning the Mirror Copy
With the half-sphere layer active, press Ctrl + T for Free Transform, right-click inside the bounding box, and choose Flip Horizontally. The left half now sits on the right side, a mirror image of the healthy hemisphere. Hold Shift and drag it across until its curved edge lines up with the sphere's outline. Shift keeps the movement constrained, so you're nudging the layer along a straight path rather than introducing a slight skew.

Don't expect perfection at this stage. Chrome reflections are a mix of nearby objects, sky, and ground, so a mirrored hemisphere won't match the original environment exactly. Real reflections would shift slightly across the surface. What you're aiming for is a convincing form and a consistent set of highlights, and that's achievable as long as the outline and the major specular bands line up.
Clipping the Mirror Copy with a Mask
Here's where the technique gets tidy. Add a layer mask with Layer › Layer Mask › Reveal All, which leaves the new layer fully visible. Then Alt-click the dividing line between the half-sphere layer and the original sphere layer in the Layers panel. That creates a clipping mask, so the upper layer only shows through pixels that exist on the layer below.
The practical benefit is forgiveness. Because the mirrored half is clipped to the original sphere's shape, anything that extends past the outline disappears automatically. If the half wasn't placed exactly over the right side in the previous step, that overhang gets trimmed away, so you don't have to chase the edge with precision. You can still refine the mask later if a highlight needs cleaning up, and that's the reason for keeping the mask editable instead of cropping the layer outright.
What to Watch as the Sphere Comes Together
My read is that the mirror-and-clip method works best when you're doing three things at once: checking the silhouette for a clean circle, scanning the highlights for a seam at the centerline, and looking for any reflection that repeats in a way that feels artificial. A chrome sphere can hide a lot of trickery at a glance, but a repeated shape or a hard vertical break will give the edit away quickly.
The same approach carries over well beyond spheres. Faces, product shots, bottles, and any subject with a clear axis of symmetry can be repaired this way, and the mask-based clipping keeps the edits non-destructive. The next stage of this kind of project usually shifts attention from the object's form to its surface: getting the reflections, tonal range, and dodging and burning to suggest a believable metal finish. Build the form first, though. A wobbly or lopsided sphere won't be saved by any amount of surface work.