First day cover ·
Building a Floating Monk Scene in Photoshop: Sky, Clouds and Layer Setup
Set up a surreal cave-and-clouds monk composite with layered skies, one-axis moves and a clean layer stack before the heavy masking begins.

A surreal composite like this one stacks a lot of separate photographs: sky, clouds, ground, a figure, a floating sphere, rope and rock. Each element arrives with its own perspective, light direction and tonal range. The opening stages set up the canvas and the stacking order, and the choices made there decide how much repair work shows up later. Get the foundation right and the cave, the monk and the floating sphere have a stable place to sit.

Starting with a file built for the job
Begin with a new Photoshop document sized to the final image you have in mind. The tutorial suggests a name such as "Surreal Manipulation Tutorial," though any name works as long as you can find it again. Give the file a clear name because a surreal scene often runs to dozens of layers, and a tidy file is easier to revise when the lighting or the composition changes.

Placing the sky and the clouds
Use File, then Place, to bring in the second sky image rather than opening it separately and copying across. Placed images arrive as smart objects with their own bounding box, which keeps the source file intact and lets you reposition or scale without quality loss. That matters when you're testing whether the sky sits convincingly behind the cave before committing to anything.

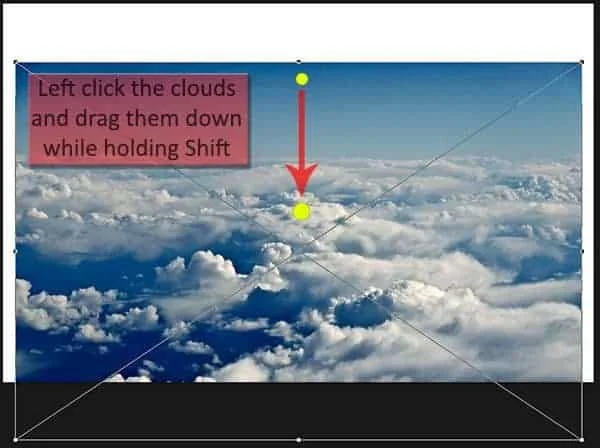
Once the sky is placed, click inside the bounding box, hold Shift and drag. Shift constrains the movement to one axis at a time, so a vertical nudge stays vertical and the horizon doesn't drift sideways. Press Enter to confirm, or click the check mark in the options bar. Then repeat the process with the second cloud image. Layering two cloud plates gives you depth, since the two sets of clouds can sit at different heights and cover different parts of the frame.

Adding the field and tidying the stack
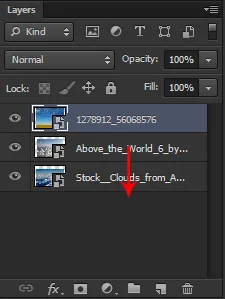
The field image goes in next, dragged past the top edge of the canvas so it sits partly outside the frame. That placement gives you room to decide later how much ground appears and where the mountains will rise. At this point the stack contains four layers, and the order is what counts. The field belongs beneath the cloud layers, so the clouds can overlap it and sell the idea that the ground is far below the viewer.
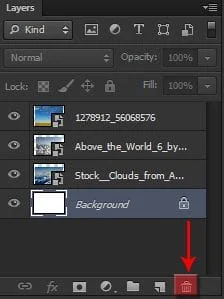
If the document still carries a Background layer, delete it. The Background layer is locked by default and would block some of the moves you need, and you won't be using it in this composite. Then drag the field layer to the bottom of the stack. Renaming each layer as you go, by double-clicking its name, is a small habit that pays off. When a scene calls for a dozen rock fragments and three rope passes, "Rock 04 copy" is far more useful than "Layer 17."

Masking the clouds instead of erasing them
The early result looks rough, and the tutorial says so openly. That's normal at this stage, because the cloud layers are still covering things they shouldn't. The fix is a layer mask on the second cloud layer. Click the mask button at the foot of the Layers panel. A mask hides pixels without deleting them, so you can paint the cloud back in, lower its opacity or change your mind entirely. For a composite where the clouds have to frame the mountain and sit below the cave, that reversibility is worth far more than the few seconds a permanent erase would save.

What to watch as the scene builds
Keep an eye on three things from here on. First, the scale of each element against the others: a monk seen against a field this size needs to read as a person standing on something solid, not a cutout floating in front of it. Second, the horizon line, which should agree across every sky, cloud and ground layer. Third, the light. Clouds lit from above and a cave lit from the side will fight each other unless you adjust the cave's highlights and shadows to match the sky. Those adjustments usually come in the later steps, but planning for them now keeps the early layers from locking you into a bad angle.

Source material and credits
The composite draws on a set of stock images, each credited to its creator: Mountains (Sxc), Field (Sxc, with an alternative on FreeImages), Sky by wyldangel-stock, Sky 2 by Skybase-stock, Little Island by mindCollision-stock, Rope by slavetofashion69-stock, Monk from Public Domain Pictures, Planet by resurgere-stock, 3D Cube by thedevstudio-stock, Knot by allysahsadie-stock, Texture 1 by insan-stock, and Texture 2 by wojtar-stock.

Gather and check your assets before you open the file, and the early steps go quickly. The real test comes when the cave goes in and the light has to agree with the sky. That's the stage where a clean layer stack starts paying back the time you spent on it.